
Mon Sep 26 2022 11 min read
From SSH-ing to Cloud Native
My (highly-opinionated) step-wise guide on how to do it.
Before 2019, all my projects were traditionally deployed on VMs — managed manually by SSH-ing into them — replicated using images or snapshotting features provided by the cloud provider. While that was enough when the projects were small, and updates were not often, some tasks were difficult or impossible to do with that setup — e.g., upgrading OS, migrating across cloud providers, automatic scaling, etc. On the other hand, I hosted projects on PaaS platforms like Google App Engine and Heroku — which had an excellent one-command deployment process. But these platforms had many limitations in covering many use cases and were tightly coupled with cloud providers.
Meanwhile, I have followed developments around Containerization, Kubernetes, etc. I saw these technologies as providing PaaS like experience on IaaS platforms. But back then, it seemed very overwhelming — unable to conceptualize the complete picture and unsure of where to start, especially for my brown-field projects. I took a step-by-step approach towards it — figuring out what technology or tool to choose from at each step. It took about 2–3 months to migrate fully. This article is about that journey — it outlines a blueprint for anyone wanting to do the same. I have tried to keep it agnostic to any framework, stack, or cloud provider. To keep it concise, I have relied on links to other good detailed resources — encourage you to go through them.
0. Prepare your application
Before starting anything, you should prepare your application to be a good citizen of Cloud Native land. You need to familiarize yourself with “The Twelve-Factor App” — a methodology for how to write Software-as-a-Service applications and deploy them.

Most good backend frameworks follow some or all principles mentioned. If the framework you use does not cover some, you will find good plugins/packages/libraries to work around it. In most cases, you are just a google search away from knowing about it.
These are generally good to follow principles, irrespective of Cloud Native. So, your efforts will not go in vain, even if you don’t go all the way.
1. Containerize your application
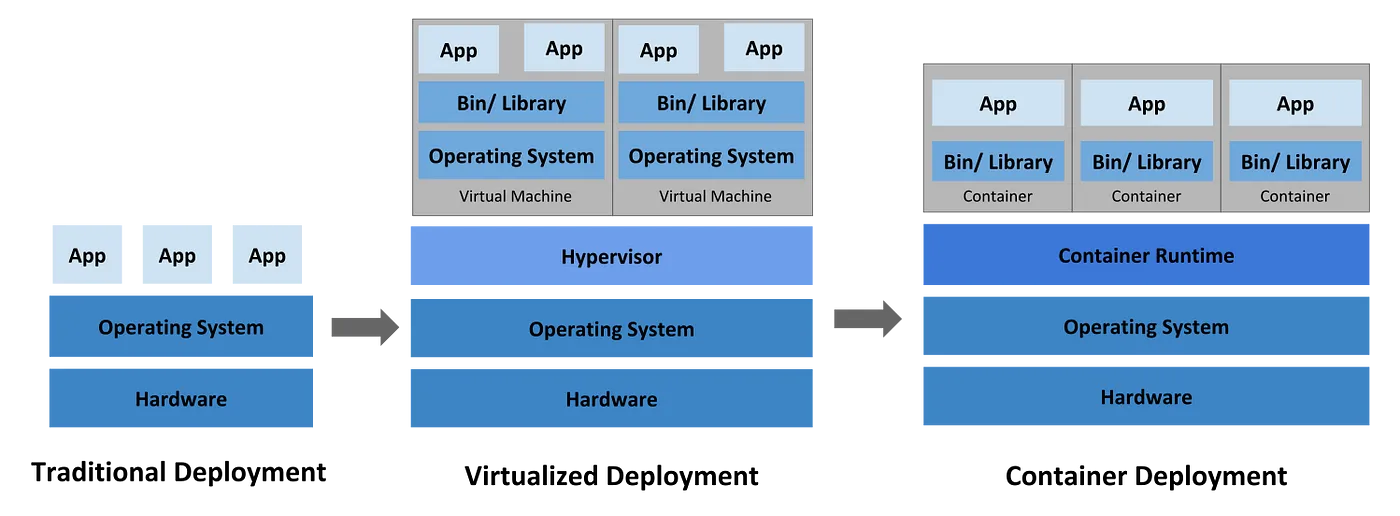
The first step towards this journey is to containerize your application — package it with all its required dependencies — so that it can run as an isolated “container” independent of any environment or host OS. Containerization (to run “container”) is similar to Virtualization (to run “VM”). But the abstraction is at different levels — it does not include the entire OS — therefore, the size and start time are significantly smaller.
Docker is the de-facto containerization tool to build, run and remotely store images. The following are some excellent resources that will help you in it:
- Docker Official Getting Started Guide
- What is Docker Used For? A Docker Container Tutorial for Beginners
- The Docker Handbook
- How to Choose a Container Registry: The Top 9 Picks
- How to Reduce Docker Image Size: 6 Optimization Methods
- How to Secure Docker for Production Environment?
For any framework-specific guide, a simple google search should help you out.
2. Write scripts for each workflow step
You will need to write scripts, command line tools, aliases, etc., to streamline all or most developer processes — like running static analysis, building applications, tests, etc. These will also come in handy when you write CI/CD pipelines in the future. You could also integrate these scripts with the IDE your team uses.

You can start with converting your README guide to an executable script that could bootstrap the dev environment for you. An automated, streamlined and repeatable process is the key to having a pleasant onboarding for developers.
You could also use the docker-compose tool to spin up all services — your application with its dependent services like DB, Caching, etc. with one command. It allows you to write your multi-container stack as a YAML file. It can be used in production as well, for simple use cases.
3. Get comfortable with k8s
Kubernetes (aka k8s) is the de-facto platform to run containerized applications in the cloud at scale. It is impossible to cover all k8s concepts here, but I will skim through various key ones.
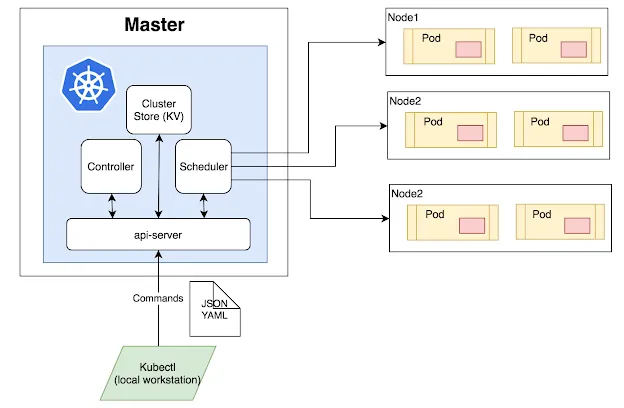
At its core, it is a controller and an orchestrator that tries to match the running state with the desired state. The desired state is provided in the form of YAML files. If you have gone through anything related to k8s, you might have come across them. It, in general, has the following format with required fields:
apiVersion: v1kind: <resource kind>metadata: name: <resource name> labels: <arbitrary key>: <arbitrary value>spec: <spec based on resource kind>The unit of compute in k8s is the Pod — a group of one or more tightly-coupled containers that share network and storage. Pods are rarely created on their own but are instead deployed using various workload resource types — based on the use case. These are some of the workload types:
- Deployment — to keep replicas of pods running and do rolling updates of them
- StatefulSet — manage “stateful” applications that require persistence
- DaemonSet — to your pods on each Node of the cluster
- Job — to run pods until it “completes”
- CronJob — to run pods periodically
Along with it, to manage configuration for the Pods, use ConfigMap and Secret resources.
These Pods are ephemeral. Therefore addressing them with IP to communicate with each other is impractical. Here, K8s’ Service resource comes to the rescue — it exposes (privately or publicly) a set of Pods as a single DNS name.
All K8s workloads are namespaced; this allows the isolation of resources within a cluster. You can deploy the same resources in different namespaces — e.g., to deploy staging and production in the same cluster.
As of now, try and stay away from running “stateful” applications inside the k8s — as it is a bit advanced. I suggest only going that route once you have been running a stable cluster for a while. Use managed services if offered or if you decide to self-host it — then do it in a standalone VM outside of k8s.
For development, to run k8s on your desktop, use minikube, MicroK8s, Docker For Desktop. Although they are good to start with, they are not full-fledged, and I would suggest using a cloud-based k8s cluster to get real experience.

Various cloud providers have managed k8s offering, here is a comparison guide. As Kubernetes is standardized, that makes it also agnostic to the provider. Therefore migrating or replicating clusters across these vendors is seamless (at least for stateless applications), making your application free of any vendor lock-ins.
4. Improve your k8s experience
Now that you have kubectl apply some YAML files to a cluster, it’s time to make this process less painful and less prone to typos!
I suggest using the following tools to manage a k8s cluster:
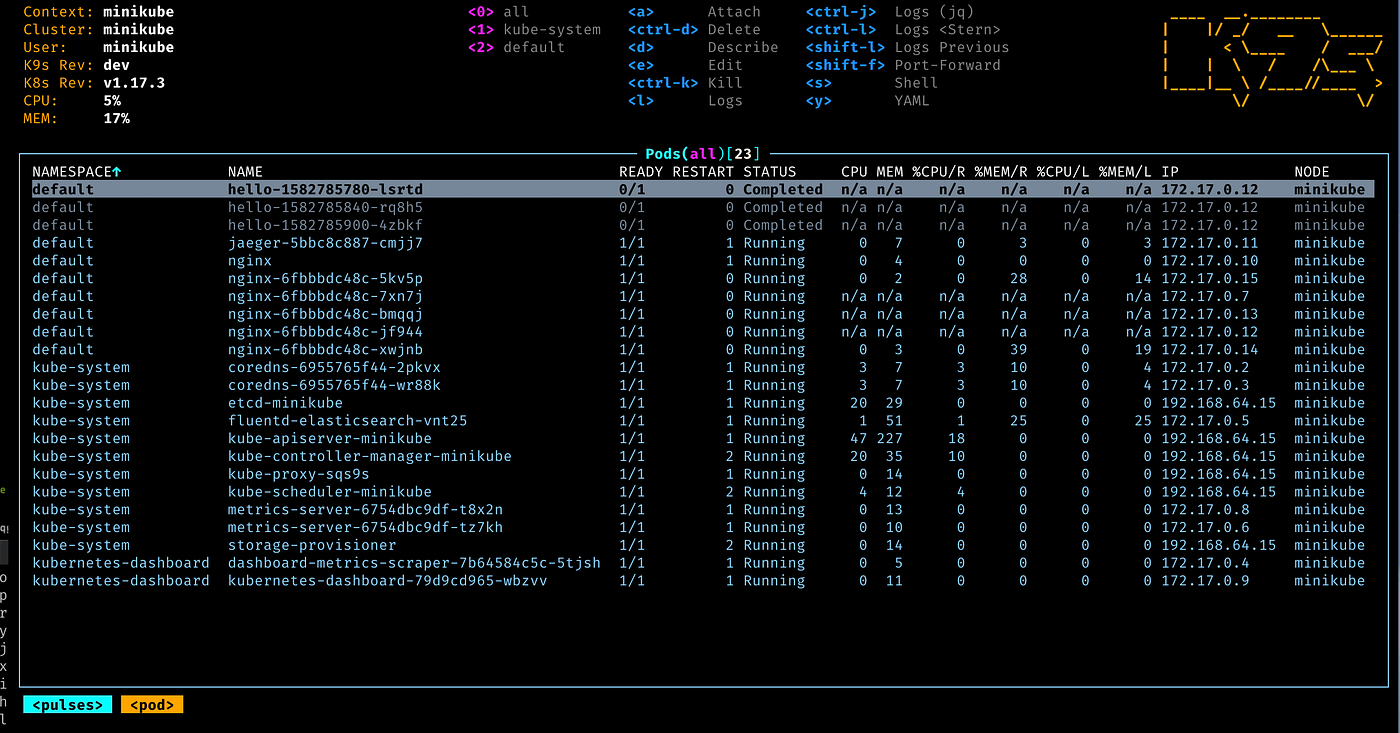
- k9s — It is an excellent command line GUI that makes k8s monitoring and managing a cakewalk. There is no need to write long commands or be precise with pod names. It is feature-rich, and I highly recommend switching to it.
- Helm — It is the de facto package manager for your k8s cluster. Essentially it is a template engine for k8s resources — simplifying deployments with no or less configuration. Along with that, it also manages the install-update-uninstall cycle of these resources. Use ArtifactHub, to find out various open source or community-managed Helm charts for services like — PostgreSQL, Redis, RabbitMQ, etc.

Some more tips:
- Use the
kubectl port-forward(or k9s) to access admin/internal services without exposing it to the outer world. - Write a Helm chart for your application. This way, your workloads are packaged and can be configured for different environments. It also makes installing staging and production with the same workloads but differing configs (like DB name, hostname, etc.). The chart generated by the
helm createcommand is a good starting point.
5. Expose your service to the Internet
While you could directly expose your K8s service with the type LoadBalancer, the preferred way is via Ingress resource and an IngressController installed in the cluster. With it, you can use a single LoadBalancer (saving cost) for multiple services instead of using one for each service.

An Ingress resource defines the HTTP(S) route from outside the cluster to the service within. It describes various ingress rules based on parameters like domain, path prefix, TLS certificates, etc.
An Ingress resource does nothing on itself; your cluster requires an IngressContoller installed to make it work. In most cases, ingress-nginx will meet your requirements, but there are many options here. I found this comprehensive comparison [sheet] beneficial.
6. Git repo for your k8s cluster
Now that you have familiarized yourself with k8s and understand how it works, it’s time to “write” and version-control your k8s cluster that you will deploy in production. This practice is called Infrastructure-as-Code (IaC), allowing you to use other source code tools like Git, Pull Request, CI, etc., with your infrastructure. We need one or more tools to achieve this, to read the code and figure out what workloads should be spun up, updated, or torn down.
Since Helm releases are the unit of our deployment, I suggest using Helmfile as the primary tool for managing them. It allows you to “write” Helm releases, have a different config for each environment, and provides convenient commands like — helmfile apply and helmfile sync. Although not a full-fledged IaC tool, i.e., it can not increase or decrease a node in a cluster but is enough to take care of our k8s needs. For that, you can use Terraform, but I found it overkill for my requirements.
Since all our configurations will be in a Git repo, we must manage secrets properly. Helmfile does this for you along with helm-secrets plugin — it encrypts these secrets so that it is safe to put them in a repo.
The file structure of my repo looks like the following:
local/ values.yaml secrets.yaml.decstaging/ values.yaml secrets.yamlproduction/ values.yaml secrets.yamlvalues/ my-app.yaml rabbitmq.yaml redis.yaml.gotmpl ...helmfile.yamlvalues.yamlsecrets.yaml.sops.yaml7. Install some must-have k8s utilities
Now, as most things are ready, some of the following must-have utilities will come in handy.
- prometheus-stack — It is the monitoring, alerting, and observability stack for your k8s cluster. It installs Prometheus and Grafana to the cluster and starts collecting vitals of all Pods right out of the box. Encourage you to learn more about it and use it to monitor your services.
- cert-manager — It will automatically manage the issuance and renewal of all your TLS certificates. It works with all issuing mechanisms or providers — self-signed, CA based, ACME server based (like Let’s Encrypt), and various thers.
- ExternalDNS — It will synchronize all K8s services and ingress with DNS providers. It works with various DNS providers.
8. CI/CD plumbing
Now let’s start triggering various builds and deployments by pushing them to our git repo. You must pick one of the CI/CD servers to run these jobs. I usually use GitLab CI as I host my git repo there.
One of the prerequisites of doing CI is to have a good automated test suite. You can execute these steps manually if you are not doing it or are not confident with it. However, I encourage you to start moving towards having a reliable automated test suite.
I configure my pipeline in the following way:
- Continuous Integration — This pipeline will execute tasks like static checks, unit tests, docker build, and push. Every commit push to any branch will trigger it.
- Continuous Deployment — This pipeline will execute all CI tasks, along with version bumps, push Helm chart, automatically deploy (with Helmfile) to staging and wait for manual approval for production deployment. Every tag push will trigger it.
These pipeline configurations are not universal. Feel free to be imaginative with it. Ultimately it is an automated process to streamline the integration of software and its deployment.
9. Continue improving
Congratulations! You should be able to deploy your production application and various dependent services in a Cloud Native way. While this may be enough, you have a long way to go when it comes to it.
I encourage you to go through various advanced concepts and patterns within k8s to take your game to the next level: